
Robertson AV Guides
How to Calculate Projector Throw Distance
By Robertson AV ·
Throw distance is the second question on almost every projector quote we price, right after brightness. Get it wrong and the image is either too small for the room or too large for the wall, and remounting a ceiling unit is never cheap. This guide covers the formula integrators use, how to read a manufacturer throw chart, worked examples for common rooms, and the mounting checklist we run before anyone drills.
What throw distance and throw ratio mean
Throw distance is the distance from the projector’s lens to the screen surface. Not from the mount plate, not from the back of the chassis, and not from the wall behind the projector. Spec sheets and online throw calculators assume lens-to-screen.
Throw ratio is how that distance relates to image width:
Throw distance = throw ratio × image width
A ratio of 1.4:1 means the projector needs to sit 1.4 times as far from the screen as the image is wide. A 100-inch 16:9 image is about 87 inches wide, so a fixed 1.4:1 lens wants roughly 122 inches of throw. Ultra short throw models drop that ratio below about 0.4:1 and sit inches from the wall. Long-throw lenses push toward 2:1 and beyond for lecture halls and rear rooms.
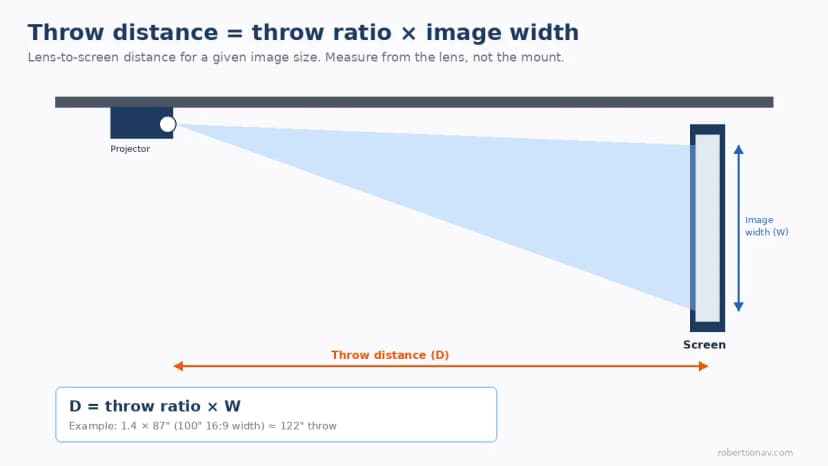
Two details trip people up. First, throw ratio is based on image width, not diagonal. Convert the diagonal to width for your aspect ratio before you multiply. Second, most business projectors use a zoom lens with a min and max ratio (for example 1.30–1.56:1). Your usable mounting band sits between those two numbers for the chosen image width.
How to read a manufacturer throw chart
Manufacturer charts plot image size against distance. They usually show a shaded band for zoom lenses: the near edge is wide-angle (lowest ratio, shortest throw), and the far edge is telephoto (highest ratio, longest throw). Fixed lenses are a single line.
When we check a chart for a room drawing, we do this:
- Lock the image diagonal and aspect from seating and content, not from leftover ceiling space.
- Convert that diagonal to width (16:9 width ≈ diagonal × 0.872; 16:10 width ≈ diagonal × 0.848).
- Find that width (or diagonal, if the chart is labeled that way) on the chart and read the min and max distance.
- Confirm the proposed mount falls inside that range with a few inches of margin for install tolerance.
- Note lens shift limits on the same page. Shift lets you move the image without tilting the projector; keystone corrects tilt electronically and softens the picture.
If your mount lands outside the band, you need a different zoom position (if available), a different lens, a different model, or a different screen size. Stretching keystone to “make it fit” is not a plan.
For classroom models in the mid-brightness band, our Epson PowerLite 119W room-planning checklist walks through throw and mounting on a typical 100-inch install. Brightness and throw should be checked on the same drawing; see our projector lumens guide by room size.
Worked examples
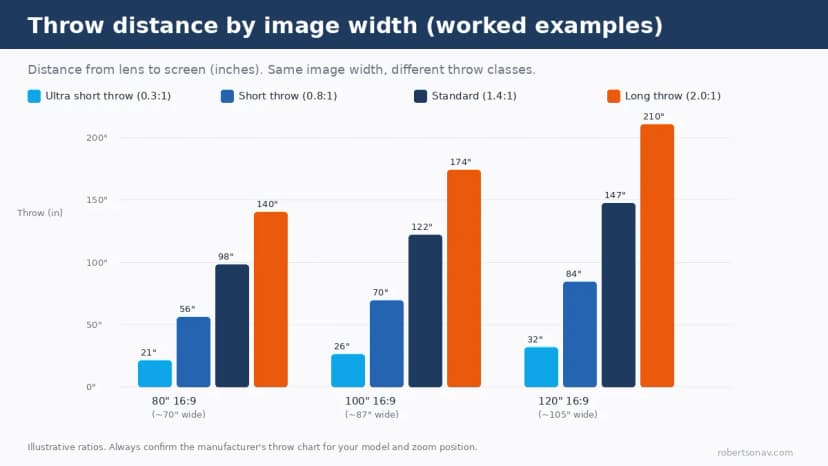
Use these as order-of-magnitude checks. Always confirm against the specific model’s chart and zoom position.
Classroom, ~100″ 16:9 (about 87″ wide)
| Throw class | Example ratio | Approx. lens-to-screen |
|---|---|---|
| Ultra short throw | 0.3:1 | ~26″ |
| Short throw | 0.8:1 | ~70″ |
| Standard zoom | 1.4:1 | ~122″ |
| Long throw | 2.0:1 | ~174″ |
A ceiling mount in the middle of a typical classroom often lands in the standard band. If the only clear mount is close to the board wall, that is where ultra short throw vs flat panel planning matters: UST clears the beam over the teacher and shrinks the required throw to under three feet.
Meeting room, 80″–120″
An 80-inch 16:9 image is about 70 inches wide. At 1.3–1.5:1 you need roughly 91–105 inches of throw. A 120-inch image (~105″ wide) at the same ratios needs about 136–158 inches. When a client wants a larger image in the same room, the mount has to move back or the lens has to go wider. There is no free lunch in the formula.
UST vs standard vs long throw
- UST (roughly under 0.4:1): wall shelf or short ceiling arm near the screen. Great for interactive boards and shadow-free teaching. Needs a compatible screen surface; many ALR screens are UST-specific.
- Short throw (roughly 0.5–1.0:1): useful when a standard mount would put the projector over the first rows.
- Standard (roughly 1.2–1.8:1): the default for most conference and classroom ceilings.
- Long throw (2:1 and up): lecture halls, rooms with a rear equipment closet, or installs that must clear a center aisle and lighting.
Home cinema lenses, including many covered in our Epson 4K PRO-UHD guide, often sit in the standard-to-long range with generous lens shift so the projector can hide on a rear shelf.
Lens shift, keystone and the mounting checklist
Lens shift physically moves the image up, down or sideways while the projector stays level. That keeps pixels sharp and geometry clean. Keystone (digital corner correction) should be a last resort for small offsets. Heavy keystone reduces resolution and can make spreadsheets look soft from the back row.
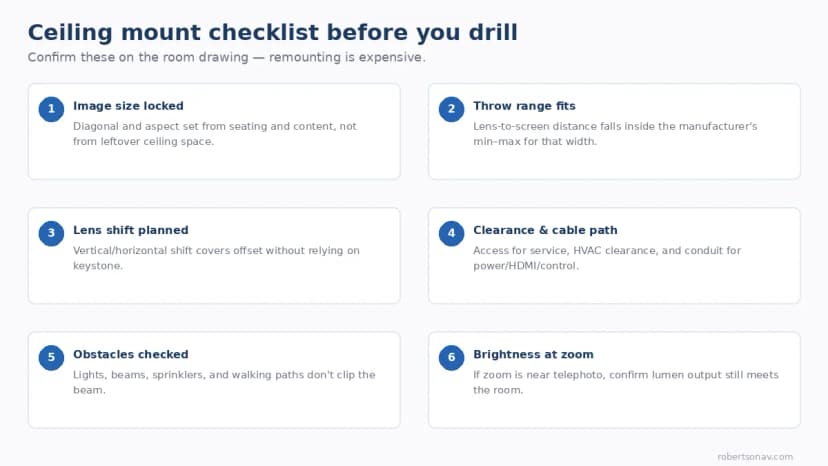
Before we drill, we confirm:
- Image size is locked from seating distance and the smallest text people must read.
- Throw range fits — lens-to-screen distance is inside the manufacturer min–max for that width.
- Lens shift covers the offset so the projector can stay level.
- Clearance and cable path — service access, HVAC clearance, and conduit for power, HDMI and control.
- Obstacles — lights, beams, sprinklers and walking paths do not clip the beam.
- Brightness at the chosen zoom — many projectors are dimmest at the telephoto end; if you need max throw, recheck lumens.
Send room length, ceiling height, screen size and preferred mount location through the quote request page. We will check throw, shift and brightness together before recommending a model.
Common mistakes
- Measuring from the wall or the mount plate instead of the lens. Specs assume lens-to-screen; a few inches of chassis depth can push you out of range on short-throw installs.
- Using diagonal as width. The formula needs width. On 16:9, width is roughly 87% of the diagonal.
- Ignoring zoom position. Landing at the extreme telephoto end may fit the geometry but cost brightness and increase fan noise if you compensate with full power.
- Fixing a miss with keystone. If you need more than a few degrees of correction, remount or change the lens or model.
- Locking the mount before locking image size. Clients often ask for a larger image after the quote. Change the diagonal and the throw requirement moves with it.
Remount vs change the lens or model
When a dry-fit fails, we choose the cheapest durable fix:
- Small miss inside shift range: adjust shift and fine-tune zoom. No remount.
- Miss of a few inches outside the zoom band: a different mount position or drop length is usually cheaper than a new projector.
- Large miss or wrong throw class: change to a short-throw or UST model, or to a lens option on an interchangeable-lens chassis, rather than forcing keystone.
- Image size is the real problem: if the screen is oversized for the room depth, resize the image. Brightness and throw both get easier.
Throw distance, brightness and seating distance are one design, not three separate decisions. Plan them on the same drawing and the install stays on schedule.
FAQ
How do I calculate projector throw distance?
Multiply the throw ratio by the image width. Example: a 1.4:1 ratio and an 87-inch-wide (100″ 16:9) image need about 122 inches from lens to screen. Use the manufacturer’s min–max ratio if the lens zooms.
What is a good throw ratio for a classroom?
Most ceiling-mounted classroom projectors land around 1.2–1.6:1 for a ~100-inch image. If the mount must sit near the board, look at short throw or ultra short throw instead.
Does throw distance use screen width or diagonal?
Width. Convert diagonal to width for your aspect ratio before applying the throw ratio.
Can I use keystone instead of moving the projector?
Only for small corrections. Heavy keystone softens the image. Prefer lens shift and a mount that lands inside the throw range.
How close can an ultra short throw projector sit?
Often under about 0.4:1, which for a 100-inch image is roughly two feet from the screen surface. Confirm the exact chart for the model and use a compatible screen.
What if my room is too short for the projector I already bought?
Check whether a wider zoom setting or lens shift saves the install. If not, options are a shorter-throw model, an interchangeable lens (where available), a smaller image, or a flat panel.